41 hi hat setup diagram
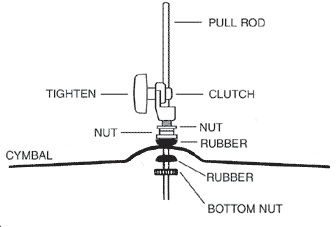
Install the top hihat cymbal. Unscrew the bottom nut on the hihat clutch - this is what holds the top hihat cymbal to the hihat stand. Place the top hihat cymbal between the 2 felt pads inside the hihat Clutch. Screw the nut back on the bottom and put the hihat clutch onto the hihat stand. Test the hihat by hitting while pressing the pedal. The Alesis Turbo Mesh Kit features an 8" mesh snare drum and (3) 8" mesh toms. It includes everything else you need to make a complete drum kit; (3) 10" cymbals, custom-designed Alesis hi-hat and kick pedals, and a durable steel rack. We also include all the cabling, drum sticks, power supply and a drum key for easy setup, so you can start ...
Hi-hat cymbals. Lay the bottom hi-hat cymbal on top of the large felt of your hi-hat stand with the bell facing down. Most hi-hat cymbals will have "Top" and "Bottom" marked on them, but if they don't, use the thicker cymbal as the bottom. Remove the bottom clutch nut and one of the felts as seen in the photo below.

Hi hat setup diagram
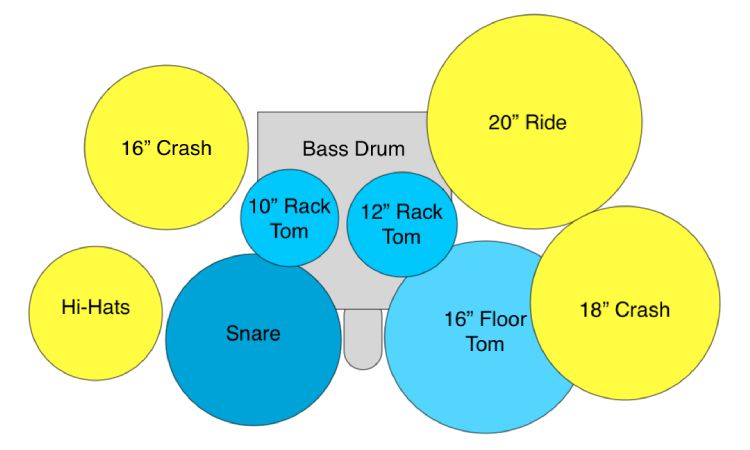
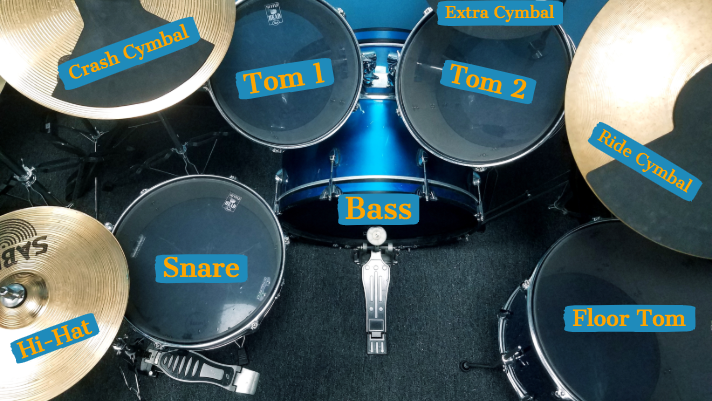
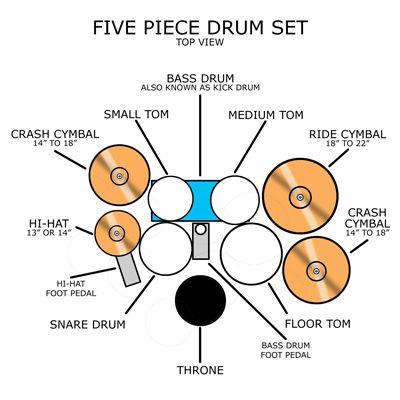
The "standard" kit setup pictured in @DEfusion's answer is optimized for a right-handed drummer playing primarily rock songs. The snare and hi-hat are the two most easily accessible pieces with the primary crash (closest to the hi-hat) also within easy reach for accents. The rest of the drums fill out from there in order of utilization. Insert the hi-hat and ride cymbal mounts (short) 6 and the crash cymbal mount (long) 7 into the holder of the curved pipe 2, and adjust the position and direction of all holders as shown in the illustration to complete the setup. The ball portion should be visible by the player Ball Cymbal mount (Short) Cymbal mount (Short) Cymbal mount (Long ... HI-HAT HI-HAT Fig. 1: Pull apart the three legs at the bottom of the hi-hat until a stable posi-tion is reached and tighten the locking screw. Fig 2: Fix the two brackets of the pedal into the openings designed for this purpose at the foot of the pedal by pressing them together. Proceed in the same way as for assembling the bass-drum pedal.
Hi hat setup diagram. information). However, anytime you connect a different hi-hat from the previously connected one, you should calibrate it. To calibrate the hi-hat pedal: 1. Connect the hi-hat pedal to the module but do not press it down. 2. On the module, press EXT TRIG. 3. You will see a page with items including "Sensitvty" and "Function." HI-HAT STAND set up Manual for H-2050. PosiLink Twin Double Chain Drive System. Our exclusive PosiLink drive system features twin double chain driven cams, one of which accepts your choice of 6 interchangeable cam profiles (4 included and 2 optional) so you can customize the response from mild to wild. 4 DTX400K/DTX430K/DTX450K Owner's Manual PRECAUTIONS PLEASE READ CAREFULLY BEFORE PROCEEDING Please keep this manual in a safe and handy place for future reference. WARNING Always follow the basic precau tions listed below to avoid the possibility of serious injury or even death from electrical DON’T set the hi-hat so low that you can’t access the playing surfaces well. You want to be able to play the hi-hat with the tip of the stick on the top of the cymbal as well as the edge of the cymbals with the shoulder of the stick. For more information on hi-hat techniques, check out this article with 8 techniques for getting good sounds. 7.
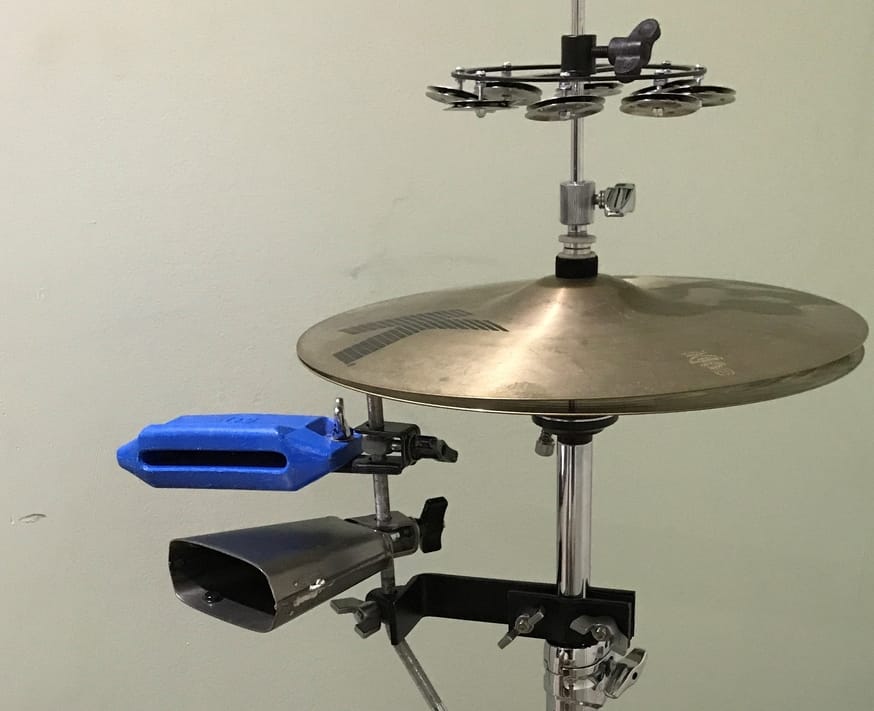
#28-29 in setup diagram (Picture #4) 28. 12" Signature Flanger Bell 29. 18" Twenty Crash. Paiste Cymbal Set up: Far right on percussion riser #30-40 in setup diagram (Picture #1) 30. 14" 2002 Flanger Splash 31. 12" Prototype Hats 32. 8" Signature Bell 33. 18" Signature Fast Crash 34. 8" Signature Prototype Splash 35. 10 ... place the Hi Hat cymbals (21) onto the Hi Hat stand. Remove the bottom stop nut, metal washer and felt washer from the Hi Hat clutch and insert the clutch thru the top Hi Hat cymbal. 17) Place the bottom Hi Hat cymbal onto the stand/upper pull rod. Then place the top cymbal on top of that and you are finished with the Hi Hat stand. The hi-hat sound will vary based on the position of the hi-hat controller pedal: • Open hi-hat: With your foot off the pedal, hit the hi-hat pad. • Closed hi-hat: With your foot pressing the pedal all the way down, hit the hi-hat pad. • Pedal close: Press the hi-hat pedal all the way down without hitting the hi-hat pad. By far, the most complex piece of the kit is the hi-hat. It consists of two hi-hit cymbals (Picture 1) that are held together by a potentially confusing holding system, all of which is controlled by a pedal and chain. First, establish the base of the stand by loosening the bottom screw, widening the legs of the stand, and retightening the screw. The already attached pedal should be flat on the floor and facing the seat (Picture 2).
The hi-hat is the final "essential" piece of kit that we need to set up. With the bass, snare, and hi-hat you can already play tons of material, particularly when playing rock or pop music. The hi-hat is usually placed to the left of your snare drum for right handed players, or to the right for left handed players. 3. Connect speakers (sold separately) to the Outputsand/or connect 1/8" stereo headphones (sold separately) to the Phonesoutput. Turn the Volumeknob all the way down (counterclockwise). 4. Connect the module to a power source, using the included power adapter (9 VDC, 500 mA, center positive). 5. Press the Power Switchto turn the module on. 6. But examine the innovative new VH-11 floating hi-hat, and you'll see that it's actually comprised of one floating cymbal pad atop a fixed lower base. Great for fast setup and easy transport, the VH-11 mounts on conventional hi-hat stands, and provides a similar playing feel to a 2-piece hi-hat. The VH-11 is fully compatible with Roland's TD ... Another work in progress that you can learn from while we continue perfecting it.
Hi-hat - Wikipedia
You want a direct, straight line from the toe of your hi-hat pedal up through your leg to your hip flexor. The hi-hat pedal and bass drum pedal should be arranged in a symmetrical “V” formation ( Fig. 6 ), with you sitting comfortably at the apex, your snare drum directly between your legs without your thighs touching it. Fig. 6

UNION DRUMS SET ASSEMBLY INSTRUCTIONS Pages 1-4 - Flip PDF ...
A beginner set of hi-hats can cost around $10. But it is easier to find a much better-quality set for around $150 to $200. 5. Ride. The sharp pitch of the hi-hat can become too aggressive depending on the mood of a composition. And you may favor a warmer, softer tone with more resonance.

Amazon.com: Pearl Hi-Hat Stand (H1030S) : Everything Else
Set up your hi-hat. When sitting at your drum set, the positioning of your hi-hat should be just to the left of your snare. You attach hi-hat cymbals to the rod of your stand using a clutch that secures the top cymbal to the rod. This allows you to open and close the hi-hats. Make sure that the pedal for your hi-hat is in a position where your ...

Guitar Alliance Presents: Drum Drills
This is a complete beginners guide to setting up the Hi-Hat stand and attaching the cymbals to the Jinbao Drum Kits.

basic five piece drum set, back view | Drum patterns, Learn ...
For more info on setting up your kit, please visit http://drumlessonsgirl.com/store and pick up the "Let's Get Started" Chapter

YAMAHA DTX Electronic Drum Kit User Manual - Manuals+
To attach the bottom hi-hat cymbal first, remove the hi-hat clutch and set the bottom hi-hat cymbal on the rubber washer. At this time, make sure that the metal plate and the rubber washer are on the cymbal support plate. Rotate the knurled head bolt, located under the plate, to adjust the angle of the cymbal then secure with the fixing nut.

How to Set Up a Subwoofer for Maximum Punch | PreSonus
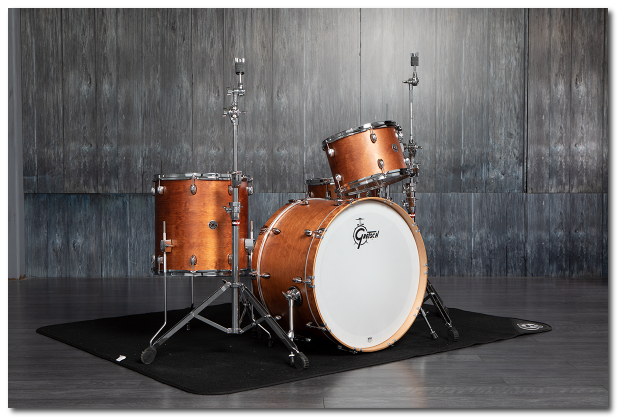
Drum set positioning is crucial for every drummer. The way you set your drums up will determine how comfortable you feel behind the kit. Different drum set configurations often yield different results, so it’s important to find a setup option that makes you feel most at home behind the kit. Before thinking about how to set your drums up, you need to remember to do it ergonomically. That’s a conversation for another day, but just be sure to keep ergonomics and technique in mind when positioning your drums. There are a few standard ways of setting your kit up. We’ll talk through those and I’ll explain the benefits and drawbacks of each one. There are also a few unconventional drum set configurations that you could go for. Look through all of them and decide which setup sounds like the best one for you. You may find that you like more than one drum kit configuration, which brings us to the topic of switching things around.
How to Set Up a Hi-Hat - Cymbal and Hardware Do's and Don'ts
Go to the Melodics homepage and download the free app for your OS. Once downloaded, go to your Downloads folder, run the installer, and then launch the app. When prompted to enter your promo code, go to your Alesis account's My Products section, then copy and paste the code listed. Click the image to register your Alesis Command Mesh drum kit.
PDHH800 PDP Hi-Hat Stand PDHH800 PDP Hi-Hat Stand
3 - Hi Hat/Snare Setup: Before you get any further, you'll want to make sure that your hi hat stand and snare drum are properly positioned to your liking. The reason to do this before completing the double pedal setup is that I generally don't like to sacrifice the placement of my hi hat and snare in order to make a bass drum pedal work.

Drum kit - Wikipedia
If you need more hi-hat in your mix, move the snare mic clockwise around the circumference of the snare to point in the direction of the drummer's left leg. To reduce bleed from the hi-hat, move the snare mic anticlockwise around the snare so that it points away from the hi-hat towards the drummer's right leg. The Glyn Johns Method Page 5

System setup: (a) Five piece drum set design without brass ...
DW 5000 SERIES HI-HAT STAND Remove the stand, accessories and all packing materials from the box, then follow these instructions to set-up and adjust your hi-hat to fit the way you play. Section 1: Assembly 1.1: Base Section (5500TD & 5500TL) 1. Loosen the four keyscrews on the sides of the footboard assembly and unfold the

PDP Schematics | Pacific Drums and Percussion
5500 Model Hi Hats. Heavy-duty 5000 hi-hats are offered in both 2-leg and 3-leg models, and feature lateral cymbal seat adjustment, integrated memory locks and 379 locking clutch. [1" upper tube] [1 1/8" base tube] 5500 Model Hi Hats are NOW AVAILABLE ONLINE *Prices and specifications are subject to change without notice.

Ludwig Drums :: Pro LAP16HH
8.3 The Hi-Hat Clutch Assembly · Unscrew the hi-hat clutch wing nut and remove the hi-hat clutch from the hi-hat rod. · Turn the lower pitched cymbal upside down, ...

How To Create A Hybrid Electronic-Acoustic Drum Set - DRUM ...
Connect the AC adaptor and speakers Wing nut Felt washer Attach the snare (PDX-8) and toms (PD-8) Attach the hi-hat (CY-5) Attach the crash cymbal (CY-8) and ride cymbal (CY-8) Assemble the kick (KD-8) Upper clutch Clutch felt (large) Lower clutch Clutch felt (small) While pressing Use Drum Key to tighten

Nuosheng drum silencer pad Mute pad Jazz drum pad silencer ...
HI-HAT HI-HAT Fig. 1: Pull apart the three legs at the bottom of the hi-hat until a stable posi-tion is reached and tighten the locking screw. Fig 2: Fix the two brackets of the pedal into the openings designed for this purpose at the foot of the pedal by pressing them together. Proceed in the same way as for assembling the bass-drum pedal.
Yamaha HS650A Hi-Hat Stand | Shopee Malaysia
Insert the hi-hat and ride cymbal mounts (short) 6 and the crash cymbal mount (long) 7 into the holder of the curved pipe 2, and adjust the position and direction of all holders as shown in the illustration to complete the setup. The ball portion should be visible by the player Ball Cymbal mount (Short) Cymbal mount (Short) Cymbal mount (Long ...
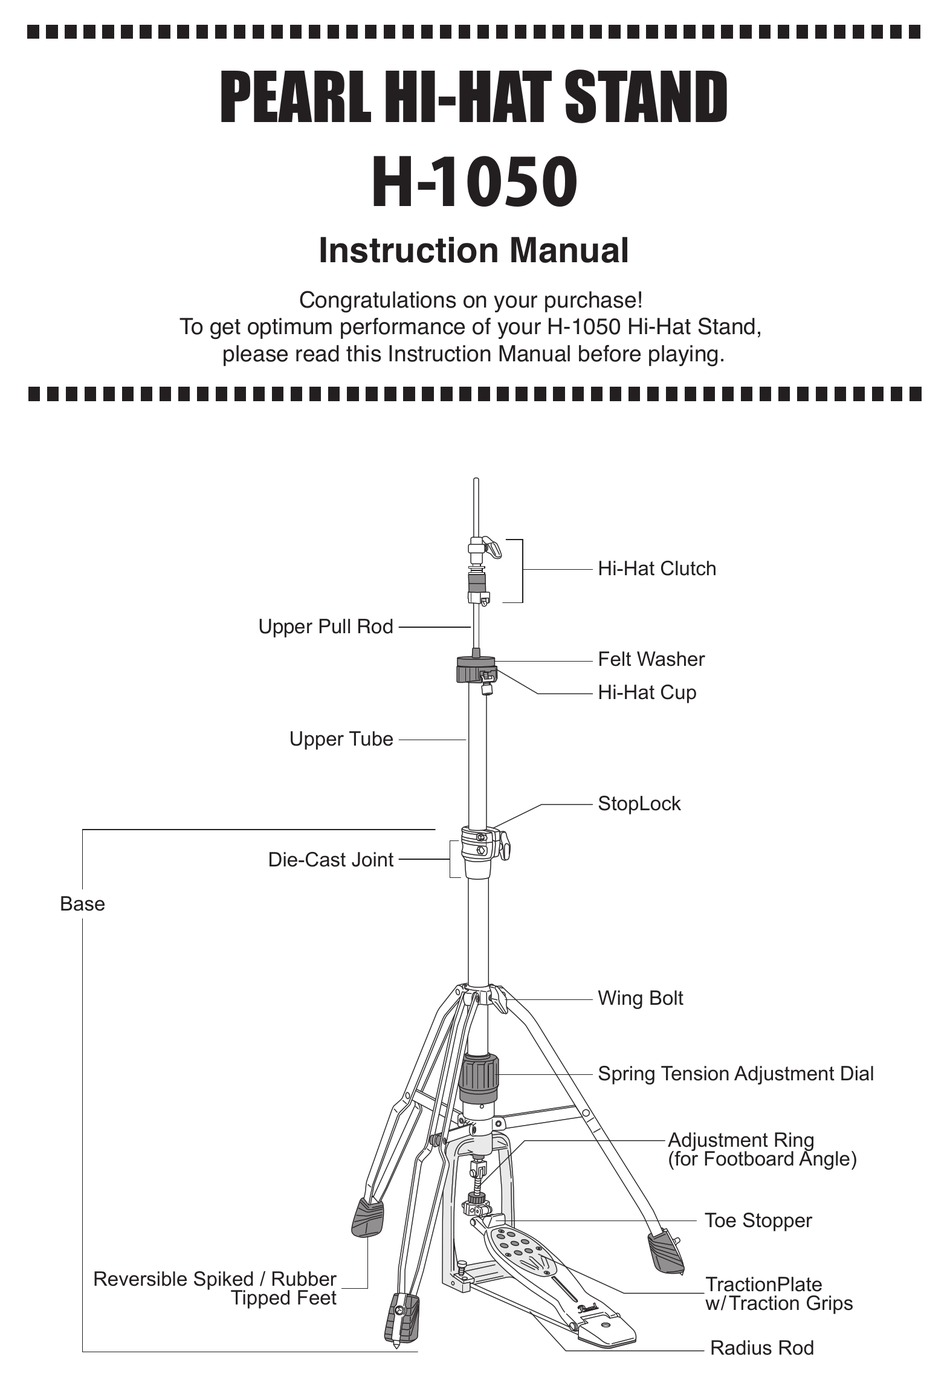
PEARL H-1050 INSTRUCTION MANUAL Pdf Download | ManualsLib
The "standard" kit setup pictured in @DEfusion's answer is optimized for a right-handed drummer playing primarily rock songs. The snare and hi-hat are the two most easily accessible pieces with the primary crash (closest to the hi-hat) also within easy reach for accents. The rest of the drums fill out from there in order of utilization.

Amazon.com: DW DWCP9502LB8 Hi-Hat Stand : Musical Instruments

Billiam en Twitter: "Pretty sure the Bass drum and 16 floor ...

Hi Hat Setup
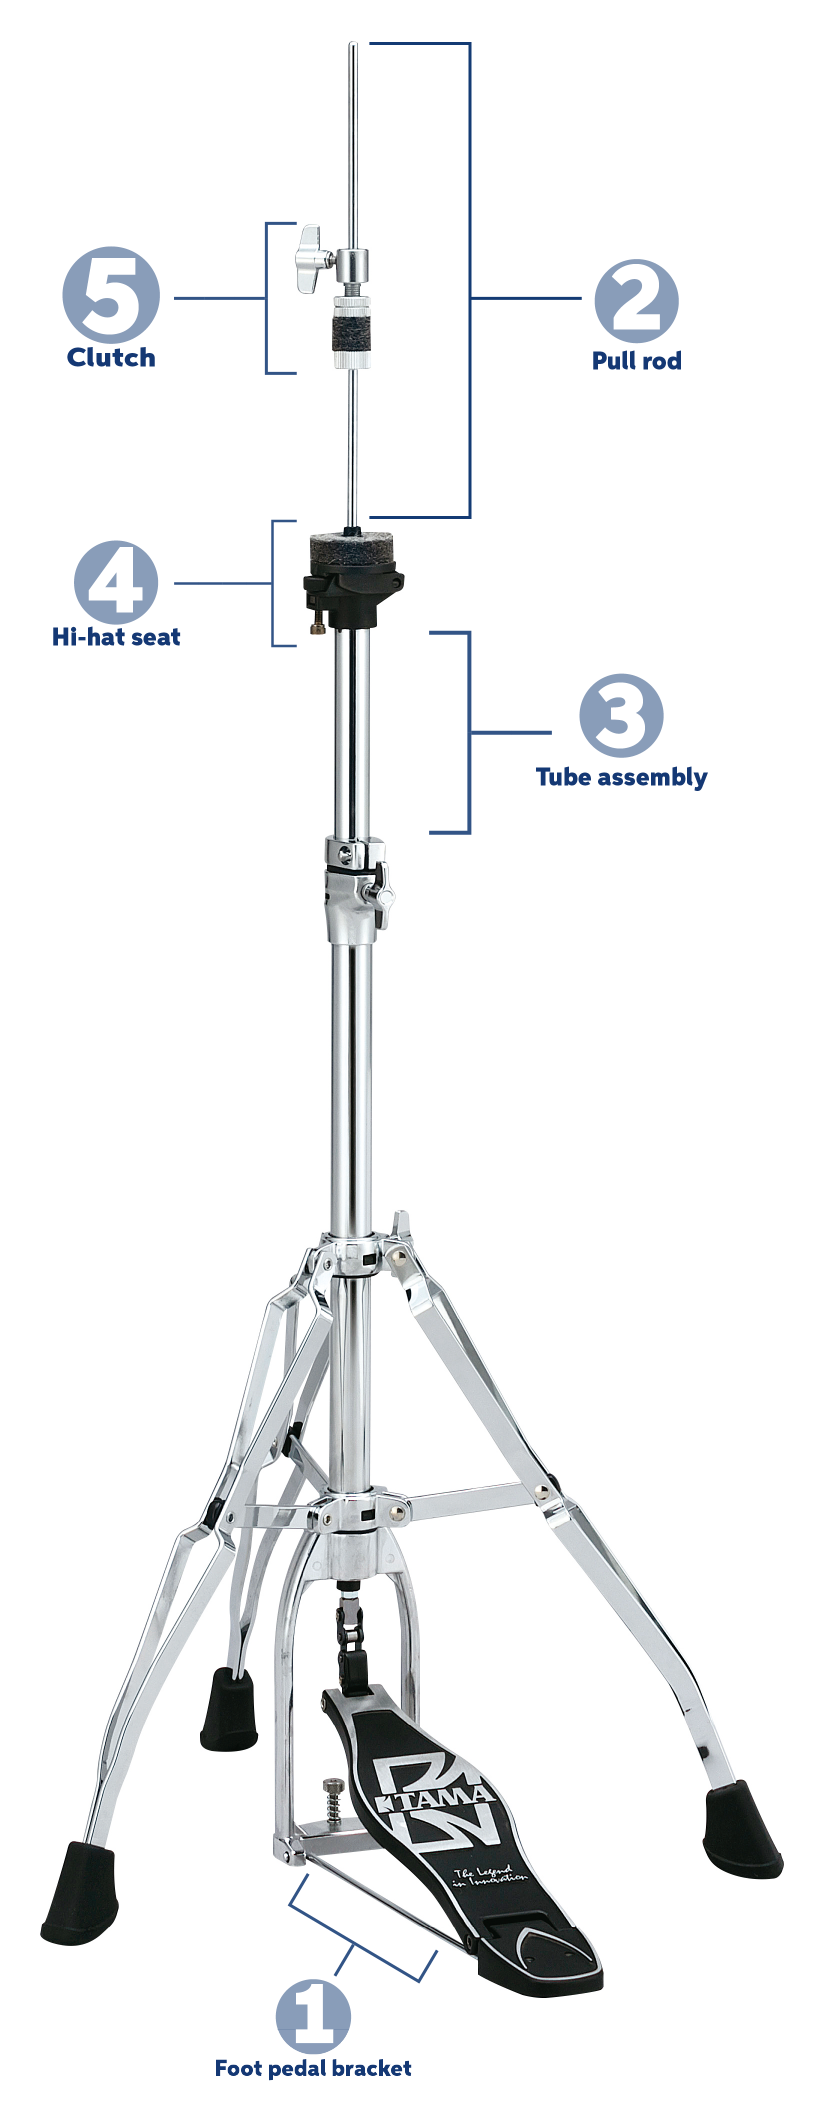
Hi hat stand diagram | Sweetwater

YAMAHA Drums User Manual - Manuals+

How To Mount Hi-Hat Cymbals On A Stand-Setting Up A Drumset
Popular Drum Setup Ideas and Configurations (With Diagrams)

Drum Setup and Ergonomics | Drum Lessons
How to Set Up a Drum Kit | Sweetwater
Acoustic Drums 101 -

How to Assemble a Typical Drum Set : 10 Steps - Instructables

Eastar 22 inch Drum Set Kit Full Size for Adult Junior Teen 5 ...

Alesis Drums Nitro Mesh Kit – Eight Piece All Mesh Electronic ...

Everlong - Marc D'Agostino

How to Make a Hi-Hat Stand : 8 Steps (with Pictures ...
Is there a "standard" or "typical" drum kit layout? - Music ...
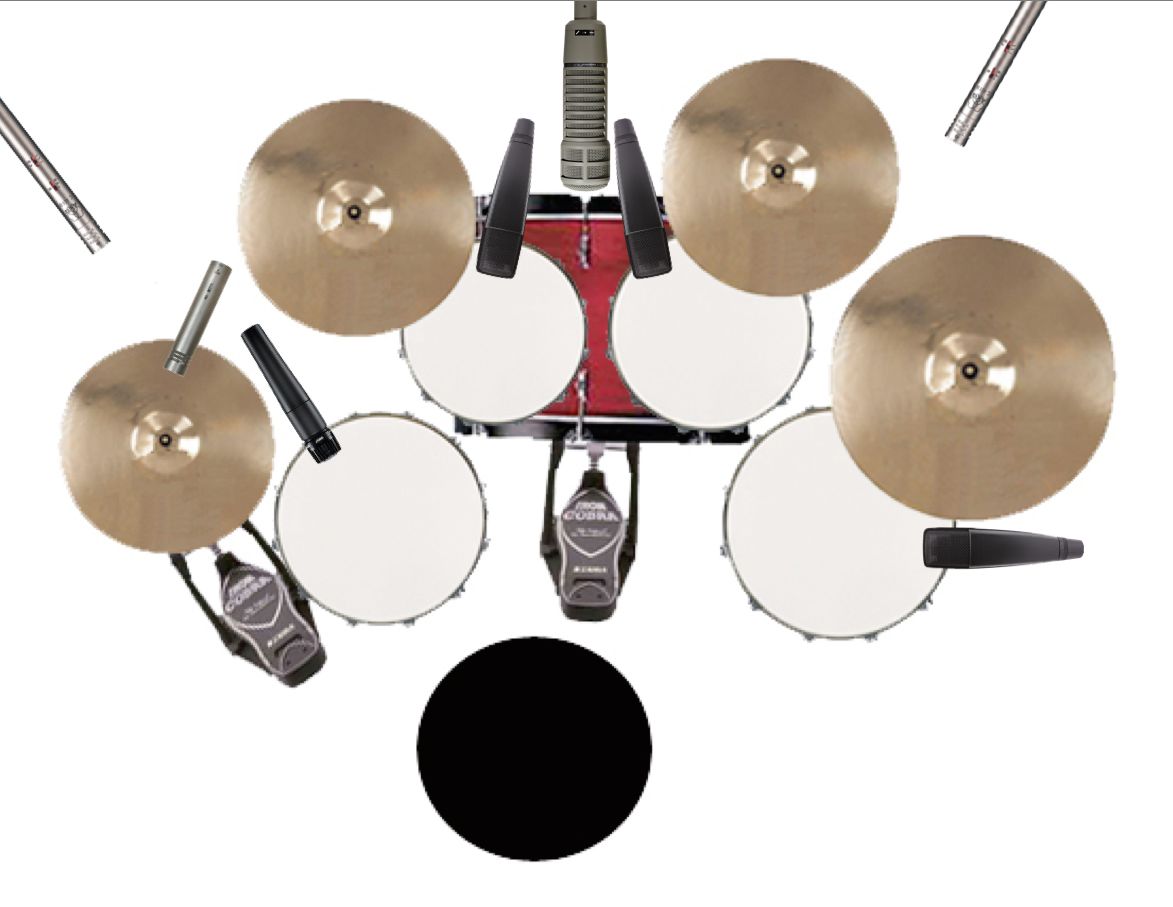
6 Mistakes To Avoid When Recording Drums

Dave Elitch: Words to the Wise from a Teacher's Teacher ...
Index of /image/Drums Lessons/Setup

8.3 The Hi-Hat Clutch Assembly

Buy LAGRIMA LAG-700 Electric Drum Set Electronic Kit with 5 ...

Figure 2-13.--High hat assembly.
Beginner Drum Kit - Setting Up the Drum Kit | Liberty Park Music
Post your Double Bass drum kits with comfortable hihat placement.
Comments
Post a Comment